Seed Starting 101 Virtual Workshop: Sow & Grow Details
We’ve condensed our Seed Starting 101 workshop into a virtual lesson so that you can start your garden early at home. It’s never been a better time to grow your own food. Why start your seedlings indoors? Better plant selection (you get to choose unique varieties!), earlier harvest, stronger seedlings, big cost savings, and… it’s just so satisfying to grow your own plants!
Check out our Seed Starting video below for the basics to get started, and then scroll down this post to take a closer look at choosing the right seeds, determining your soil/garden advantages, gathering materials, and more.
How do I choose which seeds to start?
Choosing what seeds to sow depends both on what you already have and what you want. You should know the following…
Your climate and conditions: In Easton, we’re located in the USDA Plant Hardiness Zone 6b. You can check which zone you live in here. Knowing your geographic location, and the physical attributes there, can help to determine your area’s vegetable planting calendar. For instance, this tells us that our ‘final frost’ date is end of April to the start of May, and that our ‘first frost’ date is mid-October to the beginning of November. The Old Farmer’s Almanac has a useful Frost Dates Calculator tool here. This gives us an idea of how long our growing season is, and thus when we should start/transplant our seedlings. The old adage is that most plants can be planted around Mother’s Day, which is a safe bet for us. If you want to be sure that your soil is prepped for your garden, you can also purchase $9 soil test kits through Penn State Extension Offices, which can be mailed in. Your test will be returned with information on the pH, nutrient contents, and more, and will have helpful tips on what to add to your soil (such as peat moss, compost, etc.) to bring it where it needs to be for a general vegetable garden.
What your garden (and dinner table) will look like: Do you have a community garden plot, containers on your balcony, or a full garden in your backyard? Some plants do well for container gardens, and others do not. You should also consider what you like to cook/eat most, and how much you and your family want over the season. Gardeners have a tendency to get excited about certain varieties and end up with more bumper crops of tomatoes, zucchinis, and cucumbers than they know what to do with. A great resource for a home gardener is Square Foot Gardening by Mel Bartholomew to get an idea on how much you should plant for a single person or family, rather than starting a mini-farm at your home. (Unless that’s exactly what you’d like to do!) Know how much time you’re willing to put into gardening, and what you’d like to get out of it. That can help to determine what you end up planting this spring.
What should be planted early: In areas like ours, we can extend the growing season by starting seeds early – but only certain plants need a head start. As mentioned above, a vegetable planting calendar is great for this. Burpee has an interactive Growing Calendar tool here, which you can customize with your ZIP code and select which plants you’d like. You’ll notice that some cold-loving plants like peas, radishes, spinach, and more can be started early and directly in the soil, while tomatoes, peppers, and other warm-loving plants need the head start indoors before being transplanted once it’s warm enough for their survival.
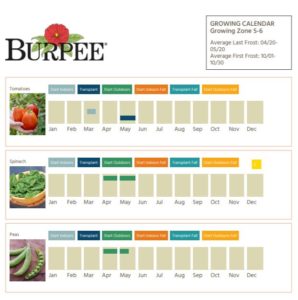
Example of Burpee Planting Calendar tool.
Where to find seeds: You can always stop by Easton’s local garden stores, or even local- and sustainable-minded shops like the Highmark Farmstand for seeds. However, requesting catalogs from High Mowing Seeds, Johnny’s, Baker Creek Heirloom Seeds, Southern Exposure Seed Exchange, Row 7, and others is helpful to look at all of your choices.
What materials do I need?
To germinate your seeds, you’ll need…
- Seeds and seed packets, growing medium/seed starting soil (we like Johnny’s 512 mix), seed trays (or DIY recycled ones – such as egg cartons, plastic cups, etc.), spray bottle and water, bucket and trowel (to mix water and growing medium to correct moisture), & heat mats with covers (or moistened towels/plastic bags)
Once your seeds have sprouted, you’ll also need…
- Light source that can be adjusted close to your seedlings, programmable timer, watering can, and larger seed trays or containers with soil and compost/fertilizer to transplant seedlings into
How do I prep my medium and trays?
Premixed commercial seed-starting mixes generally work best for germinating seeds. However, you can use any medium that is free from weed seeds/diseases/fungus, able to hold moisture but drain quickly, and is fine textured. Typically, it’s not a great idea to start seeds indoors from soil you’ve dug up from outside (it crusts over easily). Temperature, moisture, air and light are much more important to starting seeds than nutrient content is for germination. In fact, many seed-starting mediums have little nutrient content, so it’s important to start providing fertilizer once you transplant to larger containers.
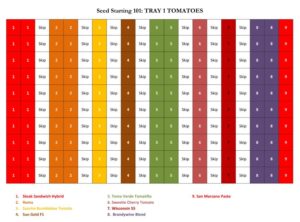
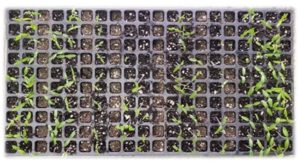
If you are re-purposing egg cartons or plastic cups, be sure to poke drainage holes at the bottom of each cell. Otherwise, you can follow the steps in the video above for moistening your soil and spreading it into seed trays. Follow the instructions on your seeds packet to see what temperatures, light levels, and other details are necessary for best germination rates. Another important step is to mark down what you’re planting and where! Our seed trays have 200 cells, and 20 rows can easily get mixed up. We like to map out what our seed trays will look like and mark down the different varieties or plants that will be planted in each cell. This will also help you reflect on how well your germination rates went… check out our planting map and our actual seed tray of tomato seedlings below.
Do I need heat mats, and how do I use them?
You’ll need heat mats if you are planting heat-loving seeds like tomatoes, peppers, onions, and more – which like to be around 70 – 85 degrees to germinate. Heat mats also help speed up the process for most seeds, so placing them on a mat that doesn’t get too hot boosts your germination rates quickly. Some heat mats are programmable so you can reach exactly the temperature that you need. Some, like ours, just plug in and warm up – so you’ll need to play with your set up (placing cardboard underneath your trays, for example) to get the right heat levels. Once most of your seeds have sprouted, take your seedlings off the heat mat and place them under your light source.
Do seedlings need a special light source set up?
You may see fancy seedling lights on the market with a purple glow and are convinced you need the very best. However, you have many options. First – let’s remember that light is made up of a rainbow of colors which happen to have different effects on plants. The green-yellow light in the spectrum is reflected by the chlorophyll in plants, and thus doesn’t help your plants grow. Orange-red light can stimulate leaf and stem growth, and violet-blue light encourages stocky growth and enzyme/respiratory processes. Despite the cosmetic effects that blue-red light has on seedlings, special plant-raising lights often aren’t necessary for starting your garden seeds. In fact, plain fluorescent lights work very well for seedlings. LEDs are more efficient and put off less heat, and also work well. If possible, avoid using incandescent bulbs, as they produce more red light (making the plants grow ‘leggy’), and they are quite inefficient while also putting off a lot of heat. If all you have is a windowsill for your seedlings, you should use a sunny south-facing window and position mirrors or white painted boards around your plants.
What do I do once they’re getting too big for their cells?
Once your seedlings are a healthy size and have grown their second set of leaves, it is time to transplant (or “pot them up”) into bigger trays/containers to encourage growth. You should transplant them into a nutrient-rich potting medium in pots or trays that have about 3 times the volume of the original pot/tray they were germinated in. Check back here soon for a demo on transplanting seedlings!