How to Save Seeds (and the planet)
Seed saving is an important step of food sovereignty, the grow-your-own lifestyle, food waste diversion, and thrift. You can watch our quick video on why saving seeds is vital for a resilient food system.
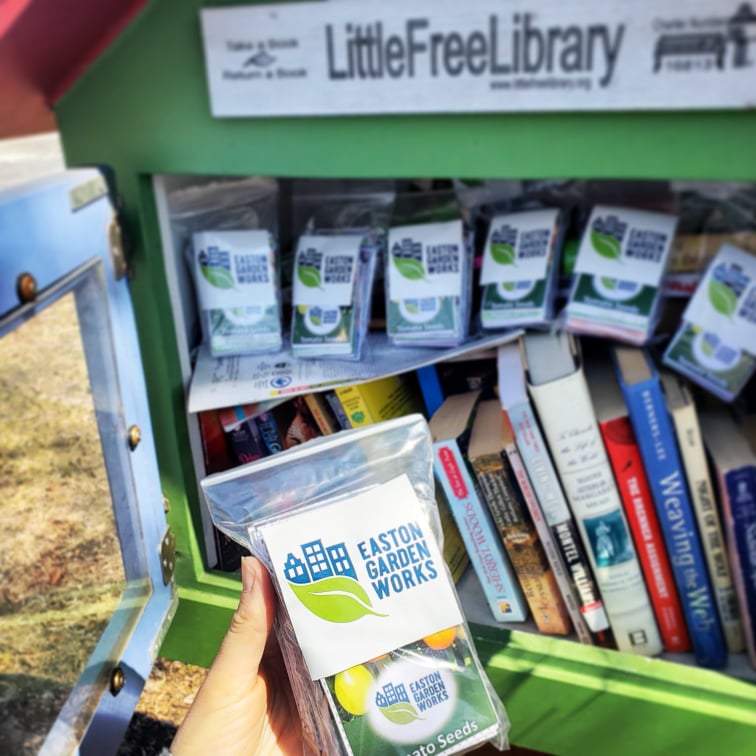
This season, Easton Garden Works is saving seed from a variety of veggies and flowers for our Seed Library. We stock Little Free Libraries around town with mini seed packets, and distribute seeds at events, to our community gardeners, and to other organizations. Plus… we’ll grow them next year.
You can save your seeds too. Before you set out to collect your seeds, here are a few general points:
- Choose the absolute best of the best. If you want to grow the best plants as possible next year, choose the veggies that are most vigorous, tastiest, best color… whatever you determine to be most successful that you want to duplicate.
- Make sure to collect seeds on a dry, sunny day. Preferably a few dry days in a row to ensure seeds are not wet/damp. The drying process is already longer than you’d expect (seeds should be completely brittle before stored), so collecting when there is moisture might germinate your seeds quickly and promptly die off. Trust us… it happens.
- The drying process is crucial. We place the clean seeds on coffee filters, and those on small cooling racks. Use what you’ve got. If you take your seed and can make an indent with your finger nail, it is not dry/hardened enough.
- Self- and cross-pollination terms are important to saving seeds. Self-pollinating, annual plants are easiest to save seed. Cross-pollination refers to plants pollinating others, thus combining characteristics of the two. You’ll also want to choose ‘open-pollinated’ varieties… or otherwise, not ‘hybrids’, which are difficult to predict what characteristics might show when they’re grown next. Hybrids aren’t a wild, cross-pollinated plant – pollination is controlled, often resulting in infertility if saving seed from “F1” varieties. This can get pretty in depth the more you know/read up…
- Label your seed containers with the plant, its variety, and the date you stored it on. Some seeds are viable with longer storage dates than others, so check your dates before the next planting to see if its likely that they’ll sprout.
- Seeds should be kept in a cool, dry place… Refer to our germination mishap above. Lol.
- Be creative! Some seeds can be used themselves as spices – like cilantro (coriander) and dill seeds. They also can make lovely dried bouquets if you don’t plan on planting the seeds. Let’s not delve into the endless arts & crafts possibilities.
The best veggies to start your seed saving journey are tomatoes & peppers, but check out the rest we’re saving this season.
Calendula & cosmos: allow flowers to completely die off. Once seeds are brown and brittle, deadhead the tops on a sunny, dry day and separate the seeds from the stems. Lay seeds out to dry until completely brittle & store in a cool, dry space.
Cilantro: Leave cilantro plants alone (stop snipping herbs) until flowering shoots emerge with white flowers. Let the flowers die off, form small green seeds, and let the stem go brown. Allow the seeds to turn completely brown and hard before cutting off the stem with the seeds. You can hang the stem upside down to further dry out, with a paper bag around the top to catch the seeds as they dry and fall off. You can also simply let the stem dry out until the seeds are falling off or can be plucked. Cilantro seeds are also known as coriander! You can use the seeds as whole spices or grind them for cooking.
Dill: Allow plant to flower – flower will be yellow before turning brown and forming seeds. Let seeds dry off until they are brown and brittle, and snip the stem on a dry, sunny day. Like cilantro, you can hang the stem upside down with a bag, or you can let dry completely. Dill seed can also be used whole or crushed for cooking.
Garlic: It’s easier to grow garlic from the bulb. Take the head of garlic, break into cloves, and plant in the fall. If you’re really ambitious and want to save the seed, allow the garlic to flower in the spring (leave the scapes until they flower and turn to seed).
Milkweed: allow seed pods to turn from green to brown and crack open. You’ll see the fluffy white hairs the seeds are attached to. Snap off seed pods on a sunny, dry day in autumn. Carefully scoop out the seeds, separate from the strings, dry seeds until they are brittle & store in a cool, dry space. Alternatively, you can scatter the seeds by blowing them from the seed pod. Milkweed seeds require a cold period (stratification) for them to germinate… so plant (or scatter) them before winter.
Okra: Let the plant flower and grow into okra. Do not snip the vegetable, but allow it to grow very large and woody; it will brown and dry out. As they dry out on the plant, they’ll be ready to pluck once they begin to crack. Cut off the okra seed pod on a dry, sunny day. Carefully break open the pod and catch the round seeds. Make sure they are fully dry, then store.
Peppers: Let the peppers ripen completely and even become wrinkled, past when you’d want to harvest them to eat. Cut open the peppers and scrape out the seeds. You can remove seeds which look past their prime (brown, broken – ones that won’t germinate well). Dry the seeds completely and store in a cool, dry place.
Potatoes: Potato tubers can be cut into pieces and planted. Often, people purchase ‘seed potatoes’ to avoid issues with disease. Harvest your potatoes and store in a dark, cool place until spring. When its time to plant, take your potatoes out, leave in the light for a few days (until they just begin to sprout at the ‘eyes’), and cut into pieces (each should have an “eye”).
Squash: Squash seeds can be saved in a similar process to the tomato instructions below. But, if you’re carving a jack-o-lantern and are scooping out the seeds and want a simpler process, you can wash thoroughly, dry very well, and store in a cool, dry place.
Tomatoes: Tomatoes are one of the most popular vegetables for saving seeds. Choose your favorite variety, and let it ripen on the vine (until ready to be eaten or past). Cut tomato open and scoop out the seeds (and goop surrounding them) into jars. Swish water into the jar so seeds can float around the gel. Bad seeds will float to the top, and viable seeds will sink to the bottom. You can scoop out the top seeds. Let jars sit and ferment for 3 days. No, really, let them get a little gross on the top. Swish the jars’ contents around occasionally. After 3 – 5 days, swish more water into the jars and then drain with a strainer that catches the seeds, then rinse to clean the seeds off. Allow to dry for several days until seeds are brittle. Store in a cool, dry place.
Zinnias: Wait until flowers have lost their petals and completely turned brown and brittle. Snip the flower heads off on a dry, sunny day and let sit indoors for several days to continue to dry out. Gently pull the seeds off the head, spread out on a paper towel or coffee filter to continue drying for a few more days. Store them in a cool, dry place.